|
2X4 +
Superhet
4 X 2 ¼ X 2 ¼ "Minibox" (Bud CU-3003) is used as a dust cover and shield for C-1; the leads from the stators are brought through clearance holes in the chassis. The input and oscillator coils are supported by multiple tie-point strips, as are the four silicon diodes of the power supply and many of the other components. The insulated couplings for C-4 and C-7 are Millen 39006. Ca-pacitor C-2 is supported at one end by a tie point and at the other by a contact on relay K-1. This relay is one used in radio-controlled model airplane work but it is ideal in this receiver application because it is so small and inexpensive. Shielded wire is used in several places in the receiver, as indicated in Fig. 5-37. The leads to the audio control, R-2, are made from audio wire, which is a shielded wire with an insulating outer covering. This type of audio. wire is also used for the long shielded lead running from R-1 to J-2 and the short lead from J-1 to L-1. The two crystals, Y-1 and Y-2, mount in an octal socket (Amphenol 77M1P8) from which pins 2 and 6 have been removed. The crystals plug into 1 and 3 and into 5 and 7, and pins 4 and 8 are grounded. In the B.F.O. section, the rotor of C-7 is grounded to a tie point held in place by one of the mounting screws of L-10. The two 330-pf. capacitors are supported by tie points on the same strip. The shield on C-1 is grounded to a lug under the head of the screw that holds the tie-point strip supporting L5. The grounding of this shield is important because if it is omitted the input circuits will be overcoupled. The 3 to 30-pf. mica trimmer across C-1A is soldered directly to the terminals of the capacitor section. The 100-pf. capacitor across L-9 is mounted on the inductor inside the shield can. The alignment procedure can be expedited if a short-wave receiver or a signal generator can be |
borrowed. The receiver can be used to listen for the signals from the 2 X 4 + B.F.O.and high-frequency oscillator, and the signal generator can be used to provide signals for aligning the i.f. circuits and the input. Lacking these, a grid-dip meter can be used to provide a signal source and to check the resonances of the tuned circuits. If a 100-kc. oscillator is available, it can be used to align the receiver. A last desperate measure is to use a broadcast receiver as a signal generator; when the B.C.receiver is tuned to 1245 kc. its oscillator will be on 1700 kc. if the I.F. is 455 kc., as is usually the case. A wire from around the b.c. receiver to the 2 x 4 + should provide sufficient signal. The audio amplifier of the receiver should be checked first, by turning on the receiver and listening to the headphones as the audio control, R-2, is advanced. When it is full clockwise a low-pitched hum should be just audible in the head-phones. A further check can be made by touching the center terminal of R-2 with the tip of a screw-driver, which should result in a click in the out-put. If a signal generator is available, the I.F.can be aligned by introducing a modulated 1700-kc. signal at the control grid of V-1A and peaking L-8 and L-9 for maximum audio output. As the inductors are peaked the signal-generator output should be reduced simultaneously, to avoid overloading the receiver. When the circuits are peaked on what the signal generator says is 1700 kc., "rock" the generator frequency slightly. If the output increases sharply at something other than the nominal 1700-kc. setting of the generator, it indicates that the calibration is slightly off, since this sudden peak in response is the crystal-filter frequency. Trim L-8 and L-9 on the
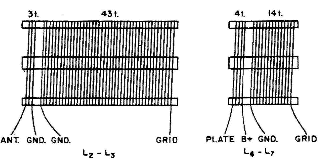
Fig. 5-38-Details of the coil construction. Each one is made from B & W 3012 Miniductor or lllumitronic 632 stock, which is wound 32 t.p.i. and ¾-inch diameter. The separation between L2 and L3 is 1 turn; the separa-tion between L6 and L7 is 1 turn. L5 is 43 turns of the same stock. It is important that the coils be connected as indicated. The coil stock con be cut to the required lengths by pushing in a turn, cutting it inside the coil and then pushing the newly cut ends through to outside the coil. Then the wire can be peeled away with the help of long-nose pliers. When sufficient turns have been removed, the support bars can be cut with a fine saw. |
![]() Back to page 3 (Schematic)
Back to page 3 (Schematic) ![]() Forward to page
5.
Forward to page
5.